Summer 21 Release Updates.
Salesforce already published summer 21 Release notes. (Click here )
In this blog, I listed few key details which are important in my view 😁
Key Dates for Summer 21
By Jun 12 all Orgs are now on Summer 21

General or Admin Summer 21 Changes
Download Dashboard as a PNG file.
Now after the summer 21 release, we will get an option to download the dashboard as a PNG file. Previously there was no provision available for us to download the Dashboard. Only we relied on a snipping tool to capture the dashboard images.

Record Access Reason in Lightning Experience.
In summer 21 Onwards we can see the Record Access Reason. Prior to Summer 21, we need to switch to classic to know the record access reason. In the below screenshot you can see a button Sharing Hierarchy this facilitates the record access reason view.

Track Your Active Licenses
Now we can see a lightning app called Lightning usage App. So once after accessing the app via App Launcher we will get an option to get an overview of Active licenses, assigned and available licenses.
This overview helps the company to take the decision on whether do they need to buy new licenses or use do they have any unused licenses etc.

Install More Custom Fields
The total hard limit for custom fields per object is increased to 900. Each salesforce edition has a limit on the number of custom fields that can be created per object. If it exceeds a certain limit then we need to free up custom fields that are n longer needed.
The new 900 fields hard limit applies only to these objects.
- Account
- AccountContactRelation
- Asset
- Campaign
- CampaignMember
- Case
- Contact
- Custom Object
- Individual
- KnowledgeArticleVersion
- Lead
- Opportunity
- OpportunityLineItem
- Order
- OrderItems (Order Product)
- Product2 (Products)
- Solution
- Users
- UserRole (Role)
Inline Editing functionality on Report (Beta)
This feature helps to do the changes on the Report inline. No need to navigate to the record detail to do changes to the column. This feature is in Beta. We need to contact salesforce to enable it.

Set Expiration of Assignments on Permissions in Permission set and Permission Set Group (Beta)
While assigning the permission set to a user we will get a option to set up the expiration date.
Suppose a sales manager needs consultants to evaluate language used in sales contracts. You give the consultants access to the Contracts object and other permissions via a permission set group so that they can perform their work. The project has an end date, so you don’t want contractors to access sales contracts after that date. Set the expiration date and time zone for the permission set group when you assign it to users.

General Development Changes
Lightning Components
- Aura Components with UI namespaces are deprecated
<?xml version="1.0" encoding="UTF-8" ?>
<LightningComponentBundle xmlns="http://soap.sforce.com/2006/04/metadata">
   <apiVersion>52.0</apiVersion>
   <isExposed>true</isExposed>
   <targets>
       <target>lightning__RecordAction</target>
   </targets>
    <targetConfigs>
   <targetConfig targets="lightning__RecordAction">
     <actionType>Action</actionType>
   </targetConfig>
 </targetConfigs>
</LightningComponentBundle>
To use a headless action, add an exposed invoke() method to your component.
import { LightningElement, api } from "lwc";

declare default class HeadlessSimple extends LightningElement {
  @api invoke() {
    console.log("Hi, I'm an action.");
  }
}
Monitor Audit Trails for Lightning Components.
Flow updates
- Build Multi-Column Screen in Flow builder

- Use Is changed in condition logic for start elements and Decision Elements.
- Use ISCHANGED,ISNEW and PRIORVALUE in Record Trigger flow.
- Control Picklist Requiredness More Accurately

- Set a Default Value for Any Screen Component That Displays Choices


In the above screenshot, you can see more than one option as default selected. This can be achieved by setting up the default parameter resource with; separated. Forex: Warm; Cold as a value for default parameter resource.
Sort And Limit Data in a Collection


Debug a Flow to See When Transactions Are Committed

How: Debug a flow in Flow Builder, and then from Debug Details, click Basic Debug Log. Select Show Governor Limit Consumption or Show Transaction Boundaries or both.

We moved the Show query limits in debug details check box from the Debug flow window to the debug details, so you can choose the details as you view them.
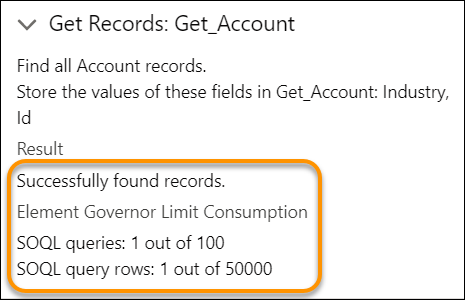
When you debug a flow from a flow error email, governor limits don’t appear in debug details.


Comments
Post a Comment